v2.23 kess v2 fw 7.020 ECU programmer

Showing posts with label auto diagnostic tool. Show all posts

Thursday, 9 March 2017

How to disable the seat belt reminder using a Saab Tech 2 clone scan tool?

This  instruction on Tech 2 Saab scanner disable seat belt reminder step-by-step.
Tool  preparation: tech 2 clone.
Connect it to the vehicle and power on.
Select your Saab model then select all.
Make sure your key is set to On.
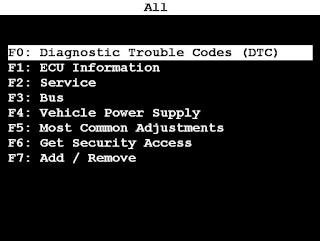
This brings you to:
Tech-2-disable-seat-belt-reminder-1
Select F5: Most Common Adjustments.
This brings you to:
Tech-2-disable-seat-belt-reminder-2
Select Seat Belt Reminder = Off


Get rid of the 90mph warning chime

the warning chime is adjusted or turned off using through the SID menus.

from the manual:

Speed warning
This value is preset to 55 mph (90 km/h).
The value can be set to between 0 and
150 mph (0 and 250 km/h).
1 Select Speed W using the INFO dial.
2 Press and hold the INFO dial until given audible confirmation.
3 Adjust the speed using the INFO dial.
4 Confirm the setting by pressing the INFO dial.
A star on the right-hand side of the display indicates when the speed warning function is active.
An audible alarm will sound if the set speed is exceeded.
Disengage the function with the CLEAR button. Re-engage the function using the INFO dial.


Tuesday, 28 June 2016

Multi-Diag Access J2534 prompt "the update of the communication interface"error

From obdexpress customer response, after the Multi-Diag Access J2534 software installed, when work with his car get a prompt "the update of the communication interface" below, in this page, to not bottom go to, the LED lights flashed not bright..
Solution:
1. To reconnect or for the other car
2. If the LED is not bright, that equipment is broken, need to send back to repair

Note:
1. Pls disconnect the network when install the software.
2. Pls follow the installation video to install the software and drivers.

http://blog.obdexpress.co.uk/ktag-ecu/

Thursday, 23 June 2016

2015R3 TCS CDP+ PRO on BMW 3 series e90- NO ISSUES

TCSCDP+ 2015R3 software has been updated and first released at OBDexpress.co.uk. Also, engineers tested OK with TCS CDP pro with 2015.3 software, on BMW 3 series E90.

Obd2express engineers tested with the best Chinese TCSCDP + (Bluetooth version)
Source: http://www.obdexpress.co.uk/wholesale/tcs-cdp-pro-diagnostic-bluetooth-a.html


Test 2015R3 software on BMW e90.
Read fault codes via USB or Bluetooth connection
Via USB/BT (com port)


Via Bluetooth (direct)


CDP pro read BMW E90 faults - SUCCESS!

Friday, 28 March 2014

Tips on how to Use a Fault Code Reader


A fault obd2 scanner assists you in repairing your automobile by telling you what the vehicle's self-diagnostic procedure "thinks" is incorrect. Given that 1996, Federal law necessitates that all cars offered within the United states of america be on-board diagnostic (OBD) compliant. The normal in 2011 is OBD2 and it is an improvement within the unique process. Whenever a fault code enters the vehicle's pc it triggers the test engine light. By understanding that code, you are able to promptly narrow down the problem and make your fix.
Turn the vehicle's ignition on the off place.
Locate the vehicle's 16-pin information hyperlink connector. This looks similar to a laptop serial port and it is ordinarily positioned beneath the dashboard below the steering wheel or within the left, bottom corner.
Push VDM UCANDAS the code reader's cable connector in to the vehicle's information link connector. Be cautious to adequately align the connections in order to avoid damaging the pins.
Look in the OBD2 code reader to determine if it automatically turned on if you plugged it in to the car. If it didn't you might possess a difficulty using a blown fuse. Verify your fuse panel and replace any blown fuses.
Turn the vehicle's ignition on the on place but don't begin the automobile. The fault code reader will immediately verify the vehicle's computer for fault codes.
Wait ten to 60 seconds for your fault code reader to download the codes. The codes is going to be displayed on the screen with an explanation of your dilemma. If there may be greater than a single code on the vehicle's computer, you'll be able to cycle as a result of them by pressing the button with an arrow pointing for the proper.
Record the fault codes CK-100 on the note pad for reference when operating on the motor vehicle.

Monday, 3 March 2014

Ways to Alter Fluid in an E40D Transmission


The Ford E4OD obd2 diagnostic, which stands for electronic four-speed overdrive, was Ford's 1st ever electronically managed transmission. Its predecessor, the C6 transmission, utilised only hydraulic pressure and mechanical linkages to operate. The E4OD uses many electronic sensors through the entire motor vehicle, as well as hydroelectrical solenoids to shift gears. This transmission noticed use in Ford full-size truck and vans, as well as SUVs through the 1990s. Part of keeping the E4OD transmission is usually to alter the fluid periodically. Ford states the fluid need to be modified every single 60,000 miles.
Raise the front with the car with a floor jack and location the jack stands under the frame rails. Reduce the automobile until eventually its fat is only on the jack stands.
Slide the drain pan under the automobile until finally it is actually right under the transmission pan, the metal pan on the bottom of the transmission.
Crawl beneath the car, loosen and remove all but four in the bolts -- depart 1 at every single corner -- from the transmission pan, applying a ratchet and socket. Loosen, but usually do not eliminate, the 4 remaining bolts, working with a ratchet and socket.
Pull down over the transmission pan to free of charge it from your base on the transmission. Fluid will begin to drain from your pan.
Remove the remaining 4 bolts through the pan, utilizing a ratchet and socket, once the fluid has stopped draining. Ensure to hold the pan as you take out these bolts, as there is certainly still fluid while in the pan and it could fall, triggering a large oil spill. Tilt the pan to a single side when all 4 bolts are removed to drain the remainder of your fluid through the pan.
Scrape the pan gasket in the top of the pan, working with the razor blade scraper, and use the abrasive pad to clean the major with the pan.
Spray the within from the transmission pan with the car components cleaner and wipe it down with store rags. Make certain to clean out all of the old fluid and debris through the pan.
Place the key pro m8 a thin bead of RTV silicone throughout the top rated a part of the pan, in which the gasket sits, and place the gasket to the pan. Ensure to line up the holes from the gasket with individuals in the pan. The RTV silicone will hold the gasket in spot when you reinstall the pan.
Place the pan back over the transmission and hand-tighten the twenty bolts. Tighten the bolts to 12 to 16 foot-pounds, inside a crisscross pattern, working with a torque wrench and socket.
Raise the motor vehicle off in the jack stands by using a floor jack and take out the jack stands. Reduce the car to the ground.
Open the Ford's hood and take away the transmission dipstick through the filler tube positioned at the rear, passenger's side of your engine. Location a funnel inside the filler tube and add about six 1/2 quarts of Mercon transmission fluid.
Reinsert the dipstick and start the vehicle. Permit it to reach operating temperature, roughly halfway up the temperature gauge around the instrument panel, and shift by just about every gear even though holding the brake pedal.
Place digiprog 3 the transmission indicator in "Park" and check out the transmission fluid degree on the dipstick. It has to be within the crosshatched location on the dipstick. When the fluid is low, include Mercon fluid till it reaches the crosshatched location.
Close the vehicle's hood and shut the engine down.
Pour the fluid through the drain pan in to the empty Mercon transmission fluid bottles, utilizing a funnel like a guide. Get this previous fluid to a nearby car components shop for proper disposal.

Tuesday, 17 December 2013

The best way to Self-Diagnose Car Engine Complications


Test the alternator and battery for weak output. Connect a volt meter or multimeter towards the optimistic and adverse battery posts although the engine is off. This tests the power in the battery. A nutritious battery reads between 12.five and 12.eight volts. Crank the engine and check once again. This tests the alternator energy, plus the reading should be in between 13.six and 14.three. In case the readings are below standard, a replacement is necessary. http://www.autelshop.com

Check the fuses for breaks. The fuse box is often underneath the dash close to the steering column or below the hood within a square compartment. Both pull every single fuse manually to inspect them visually or use a fuse tester. Ground the tester, flip the engine on with no cranking and touch the tip to every of your fuses. If just one finish of a fuse brings about the tester to light, as an alternative to both, the fuse is broken and needs to be replaced.

Pull the engine codes. Both use the essential on-and-off sequence, in which the codes flash from the "Check Engine" light, or use a scanner. Plug the scanner in to the ALDL (Assembly Line Diagnostic Hyperlink) port underneath the dash, turn the key on and follow the prompts over the screen. The engine codes inform you what challenge the computer has detected.

Look for patterns during the engine problems. Complications cranking even though cold or hot, overheating, working ragged at substantial speeds or above rough terrain are all indications that level to your supply of the problems. As an example, a car that runs terrific a minimal speed but poorly at higher speed may perhaps have loose or poorly grounded wires, loose belts or broken hoses.
Crank the engine and appear underneath the hood. Examine for vibration or movement within the engine elements, for instance broken wires and loose or torn belts. These troubles are a lot easier to spot once the engine is working.

Look for clear indications of wear or harm. Test the radiator for clogging, inspect the battery, alternator, water pump and spark plugs for corrosion. Crank the engine and run to operating temperature. Verify the fan runs, and the thermostat opens to relieve engine heat. Touch the upper radiator hose to test for heat, a sign the thermostat is opening. A lot more news and tools for self-diagnose click here.

Tuesday, 10 December 2013

How you can Inform If an Alternator is Going Negative

Continue to keep an eye on your "battery" or "alternator" light. This light should present up on your dashboard once you start off the auto (if it doesn't, it might be burned out) nevertheless it should really not flash on when you are driving. If it does, it can be a confident sign there is one thing failing as part of your alternator or your battery.

Turn in your turn signal. If a single is blinking at a slower charge than the other, or if they are blinking at a slower charge than typical, your alternator could be the genuine culprit. Other indicators incorporate the dashboard lights going dim or flickering, the power steering going out (the steering wheel becomes stiff), or dimming headlights.

Listen for your engine. A grinding noise coming in the alternator may possibly be a indicator the bearings are sporting down. A loud squeal may well also be indicative of the failing alternator or a worn alternator belt.

Look at your alternator. In the event you never know wherever your alternator is, appear on the pulley-configuration chart sticker around the front of one's engine. The alternator will likely be labeled ALT, alternator, or GEN, generator. The alternator are going to be near the front in the engine. After you locate your alternator, should the belt seems thin or worn, or if you will find belt shavings on your alternator, the belt will have to be replaced. It could also be a signal of a failing alternator.

Use a voltometer set to a DC scale. Area the red lead about the optimistic terminal of one's battery as well as the black lead to the negative, or ground. Commence the car or truck and flip off all accessories (heat, radio, lights). Rev the engine. The voltage really should be around 14 volts. If it is under twelve, there exists a great chance you have got a failed alternator. Flip on all of your accessories, and rev the engine again. If the voltometer reads significantly less than 13 volts, there's a great chance your alternator is going undesirable. Most auto-parts outlets are prepared to do that for you personally cost-free of charge.

Take out the alternator and have it load-tested. This may be the final and definitive check. In case you can't eliminate it out of your engine and take it to an auto-parts shop, you will need a mechanic to carry out this check. http://www.autelshop.com

Tuesday, 19 February 2013

Volkswagen Jetta cannot boot failure

Designs, car obd2 tools assemble the two-valve the BJG engine of a 2007 Volkswagen Jetta sedan.

Owners: get started vain motor vehicle just after automobile typical flame, turn around the ignition switch on the dashboard EPC lamp is not really lit, the decoder can not communication using the engine system.

Figure 1-22 is Digiprog 3 Odometer Programmer with Complete Application V4.82 a schematic of your engine handle unit powered Jetta sedan of 2007. In accordance on the schematic evaluation suspected J458 relay line failure. The J458 relay inner ideas and pin functions as proven in Figure 1-23.

Take out the driver side guard from your central power distribution box above to uncover J458 relays measure the relay to unplug the pin voltage, the actual measurement success present that only D foot 12V voltage, other the pin voltage are 0V. In accordance on the evaluation on the circuit diagram, the 3 Qiu feet need to possess a frequent voltage of 12V, this pin voltage fuse S51 more than likely blown. Immediately after checking the fuse S51 genuinely blown, examine the ignition coil fuse the management and engine management unit provide line and located no signs of the brief circuit, it can be estimated the last maintenance workers blown fuse short circuit check substitute the fuse, the dashboard EPC light still won't light, indicating the engine manage unit power provide isn't normal. The J458 relay pin voltage is measured again gets to be as follows: 11. 4V 85 feet, 86 feet 0V 30 feet 12 2V 87 feet 2.35V9 D foot twelve.18V. In accordance for the evaluation of the circuit diagram, the relay coil beneficial by way of the ignition switch management, damaging direct grounding speak to output of 87 feet voltage should really be 12V relay this motor vehicle 87 feet ahead of 2. 35V voltage fault is quite obvious, J458 relay contact failure, the substitute of the new relay, turn the ignition switch over the dashboard EPC lights lit, but the engine is still not the automobile. To communicate with all the decoder, several fault codes are mixture facets, simply because this automobile is usually a taxi, alteration of natural gasoline, dependant on previous experience that such models prevalent mixture fault code , irrelevant that vain motor vehicle failure, may be ignored, so the fault codes stored, clear fault codes, get started the car again and check the high-pressure fire, identified that high-pressure fire appropriately, then the the drive component check function in the decoder driven oil pump, you could hear the sound on the the J167 relay as well as the oil pump petrol tank, the essential pump get the job done typical. In this case, the go through fault codes, the normal show process. Just after 3 beginning the engine the automobile, it can be estimated the final servicing course of action, spark plug gasoline "drowned" forward on the auto following a few minutes, clear away from heat, then begin again, the car's engine is smooth, check, and found no other signs, recognized this automobile troubleshooting. Process frequently YANHUA Digiprog III exclude electronically managed engine touching the car or truck failed to verify the power of your engine control unit, faster approach is to check the dashboard engine fault light is lit within the dashboard of the automobile mentioned the 2007 VW Jetta EPC light in the engine management unit on the power-on LED, it can decide whether the engine control unit electrical power supply is ordinary. If your power provide is standard, to communicate with the decoder, to see no matter whether the fault strategies, then the fault tricks to a stage by phase troubleshooting. Motor vehicle failure will not be challenging, however the method of elimination plus the correct flow detection, to be able to swiftly locate the the J458 relay contacts bad get in touch with level of failure.

Sunday, 3 February 2013

DEUTZ diesel engine fault lights

Dump Trucks (the engine model BF6M 1013-28E3) car diagnosis tool a mileage of about 10,000 km, engine fault lights lit.

Troubleshooting 2: Reading fault code is a P0008, meaning the Backup mode is active; another is P0335, meaning the crankshaft position sensor signal. The engine can start, fault code can be cleared, but Car OBD2 Tools after starting the engine running for some time, the engine failure light up again. Clear fault codes, engine place to start, and engine fault lamp is not lit, the vehicle running for some time, failure to appear, failure may be the harness or wire connector poor contact, or harness damage at. After examination, the fan grinding off the engine wiring harness (transition harness) caused failure. Damaged harness, obd2 software and troubleshooting.

OBD2 Code Scanner

Sunday, 13 January 2013

Volkswagen Passat New Lingyu inability to accelerate(1)

A auto diagnostic tool mileage about 60000km 10 Volkswagen Passat Passat 1.8T sedan. Reflects the proprietor: The car or truck accelerated weakness phenomenon. Driving the optimum speed barely capable of attain 130 km / h, but overtaking capacity is poor. Engine fault indicator and EPC lights are certainly not lit.

Pick-up: To start with failure phenomenon to confirm. Commence the engine, engine fault indicator and EPC lights are lit, depress the accelerator pedal, the maximum engine speed in 3 800 r/min-3 900 r / min (Figure 1), that is regular since the vehicle has The speed limit function, that is definitely, in the situation of no-load, depress the accelerator pedal, the engine speed does not exceed 4 000 r / min. But naturally really feel the engine speed to boost the slow rising.

Connect the Auto Diagnostic Tool VAS 5052 to the engine control unit, read fault codes P1297 and P0299, the that means with the fault code. Attempt to clear the fault code is often cleared. The re-commissioning, the acceleration efficiency is worse, thereby determining the car fault does exist, as the engine should the engine handle unit identified defective. Will produce a fault code. Then emergency "limp mode" to handle the engine running when the fault code is cleared. The engine manage unit will re-use the data signals with the various sensors, although many of the sensor signal value is not usual, so the car diagnostic tools acceleration effectiveness might be even worse. See 002 and 033 in the data stream, the meaning of every set of data streams and described as follows.

002 group information streams:
The regular value for your engine speed on the line 1 (idling 720 r/min-900 r / min); The second line with the load around the engine (the idle regular values for 12% -28%); Line 3 injector (idle typical time of 1 ms-4 ms); Traveling 4 the gasoline (the the idle ordinary value 2g/s-4g/s).

033 sets of data flow: The correction value on the oxygen sensor with the 1st row (the usual idling -25% -25%, this value is less than 0, indicating that the partial 自動車整備工具 concentration in the gasoline mixture; this worth higher than 0. Said mixed fuel partial thinning);

Thursday, 10 January 2013

Underpowered Nissan guishi engine

The imported auto diagnostic tool Nissan guishi (QUEST) a the VG30E sort engine and automated transmission automobiles. Reflects the owner: the automobile appeared engines sometimes poor acceleration, lack of engine energy failure.

Pick-up: First, very carefully measuring the engine electronic manage unit power supply and 車用故障診断ツール grounding all standard; then they were within the major sensor and circuit measurements located that the circumstance was very good; connection failure detector to go through the fault code . Final results of each and every technique fault codes stored. Connect the oscilloscope crankshaft place sensor, camshaft position sensor and speed sensor the waveform check and measured benefits Auto Key Programmer driving a ordinary car or truck most measurement benefits. Discovered a signal waveform of each and every in the sensors described above can also be usual.

In desperation, the individuals fault once more a mindful analysis, concluded that only check out the ignition timing, the automobile could be the structure of your common scenario car diagnostic tools wholesale in the sprocket will not jump teeth, open the front cover, examine camshaft timing sprocket timing mark, discovered that the accuracy of the timing marks.