v2.23 kess v2 fw 7.020 ECU programmer

Thursday 28 April 2016
Wednesday 27 April 2016
XTOOL EZ300 Four System Diagnosis Tool user guide
Original Xtool EZ300 is a high-end and new style auto diagnostic scan tool developed based on Android system.EZ300 provides engine, ABS, SRS, transmission and TPMS diagnosis for most US, Asian and European makes.
 Here are some information about the use of XTOOL EZ300
1.EZ300 Activation
1.1. Please activate EZ300 before you use it to test vehicles.
 1.2. Connect to WiFi first. Input activation code, product serial number (each device will have a serial number and activation code), nickname (workshop’s name or user’s nickname), login account (can be your email address or cell phone number) and password, then system will remember it. Activation only needs to be done for the first time, and you never have to do it again. The diagnostic interface will come up after activation.
 2.EZ300 Main Interface and Functional Buttons Descriptions
2.1. Main Interface
Tap on EZ300 application, the main interface and sub-menus shows up as below.
 2.2. Sub-menus and Function Buttons
 2.3. Toolbar Function Buttons
 3.Vehicle Connection Diagnosis
3.1 Wireless Connection
a. Connect cables and VCI to the vehicle as below:
 b,Switch on the ignition and turn on EZ300 tablet, then tap on EZ300 application to test vehicles.
3.2 How to pair Bluetooth
a. Connect VCI box with the main test cable, then connect main test cable with OBD2 16 Pin connector or other connectors, then plug into DCL port .
b. Do not connect the EZ300 Tablet with VCI box via the USB cable. The Bluetooth will be paired automatically between EZ300 tablet and VCI box. c. Switch on the ignition and turn on EZ300 tablet, then tap on EZ300 application to test vehicles..
4.Diagnosis
4.1. Menu Options
4.1.1. After VCI box connected to vehicle and paired with EZ300 mainframe via wired or wireless means, diagnosis can be performed now. The diagnostic interface comes up as below.
 4.1.2. Users can choose menu based on their actual needs: selection for Europe means entering European cars menu, selection for Asia means entering Asian cars menu, selection for America means entering American cars menu, selection for China means entering Chinese cars menu. Users also can input vehicle model to search.
4.2. Test Functions 4.2.1. Take Volkswagen car for example, select Diagnosis, then select Europe Car, users can see Volkswagen’s logo. If the logo has not been seen, please swipe up and down or enter the car model to research.
 4.2.2. Toolbar function buttons descriptions
 Record data feedback button as shown below, showing diagnostic software version and various information in the diagnostic process.
 4.3. Read ECU
 4.4. Read DTCs
 Tip: In the process of diagnosis, if the device shows “System is OK” or “No Trouble Code”, it means there is no related trouble code stored in ECU or some troubles are not under the control of ECU, most of these troubles are mechanical system troubles or executive circuit troubles, it is also possible that signal of the sensor may bias within limits, which can be judged in Live Data.
4.5. Clear DTCs
4.5.1. Return to the previous step, select Clear DTCs to clear current and historical trouble codes memory in ECU. Performing this function will clear all the current and historical trouble codes. Make sure whether the trouble codes have been recorded before clearing, shown as below.
 4.5.2. Click YES to make clear confirmation, if the communication is normal, it will show “Trouble Codes Successfully Cleared” or “Trouble Codes Cleared”. Generally, users need re-read trouble codes after cleaning them to confirm whether the trouble codes have been cleared.
4.6. Read Live Data
 5.Settings
Select enter Settings; users can set the language, unit and other system related options: Languages: select the language. Please tick the needed option from multi-language options on the right.
 Units: Select unit of measurement. Users can tick Metric or English measurement.
 Bluetooth : Turn on Bluetooth and search the device, select EZ300, then pair it.

 System Settings: Android system setup, such as wireless, audio frequency, light sensation, etc.
6.Update
EZ300 doesn’t need insert a card for updating, users only need to tap on EZ300 application and click UPDATE , shown as follows.
 7.Report
Report is for checking the saved files, such as the report of Live Data or Trouble Codes or pictures generating in the process of diagnosis, users also can know what cars have been tested. It includes three parts: PDF Files, Pictures and Data Playback.
 7.1. PDF Files: PDF files are the diagnostic reports of Live Data or Trouble Codes in the process of diagnosis. Entering PDF can check various diagnostic reports.
 7.2. Data Replay: Data Playback can check what cars have been tested and play recorded Live Data & freeze frame.
 8.Remote
In the maintenance process, when maintenance technicians encounter problems and don’t know how to solve, they can open this application and ask for remote assistance. How to get remote assistance from Xtool Technical Assistance Center
a. Open EZ300
b. Click Remote and open TeamViewer interface. Generate and display device ID.
c. Your partner also need download and install TeamViewer complete version. d. Enter your partner’s TeamViewer ID and send remote request. The system will pop up a window and allow your partner to control yours, and then remote control begins.

1.EZ300 Activation
1.1. Please activate EZ300 before you use it to test vehicles.
2.1. Main Interface
Tap on EZ300 application, the main interface and sub-menus shows up as below.
3.1 Wireless Connection
a. Connect cables and VCI to the vehicle as below:
3.2 How to pair Bluetooth
a. Connect VCI box with the main test cable, then connect main test cable with OBD2 16 Pin connector or other connectors, then plug into DCL port .
b. Do not connect the EZ300 Tablet with VCI box via the USB cable. The Bluetooth will be paired automatically between EZ300 tablet and VCI box. c. Switch on the ignition and turn on EZ300 tablet, then tap on EZ300 application to test vehicles..
4.Diagnosis
4.1. Menu Options
4.1.1. After VCI box connected to vehicle and paired with EZ300 mainframe via wired or wireless means, diagnosis can be performed now. The diagnostic interface comes up as below.
4.2. Test Functions 4.2.1. Take Volkswagen car for example, select Diagnosis, then select Europe Car, users can see Volkswagen’s logo. If the logo has not been seen, please swipe up and down or enter the car model to research.
4.5. Clear DTCs
4.5.1. Return to the previous step, select Clear DTCs to clear current and historical trouble codes memory in ECU. Performing this function will clear all the current and historical trouble codes. Make sure whether the trouble codes have been recorded before clearing, shown as below.
4.6. Read Live Data
Select enter Settings; users can set the language, unit and other system related options: Languages: select the language. Please tick the needed option from multi-language options on the right.
6.Update
EZ300 doesn’t need insert a card for updating, users only need to tap on EZ300 application and click UPDATE , shown as follows.
Report is for checking the saved files, such as the report of Live Data or Trouble Codes or pictures generating in the process of diagnosis, users also can know what cars have been tested. It includes three parts: PDF Files, Pictures and Data Playback.
In the maintenance process, when maintenance technicians encounter problems and don’t know how to solve, they can open this application and ask for remote assistance. How to get remote assistance from Xtool Technical Assistance Center
a. Open EZ300
b. Click Remote and open TeamViewer interface. Generate and display device ID.
c. Your partner also need download and install TeamViewer complete version. d. Enter your partner’s TeamViewer ID and send remote request. The system will pop up a window and allow your partner to control yours, and then remote control begins.
Sunday 24 April 2016
How to install ETKA 7.4 Electronic Catalogue on WIN 7/8/10
It’s aimed to help install V7.4 ETKA Electronic Catalogue, which contains the full information on spare parts and accessories (separately the catalogue of accessories Audi,VW,Seat,Skoda on CD more is not issued) for cars of concern VAG, including minibuses.
First, to get V7.4 ETKA Electronic Catalogue For Audi VW Seat Skoda here:
http://www.obdexpress.co.uk/wholesale/audi-vw-seat-skoda-etka-electronic-catalogue-v74-multi-language-3169.html (Never Expire!)
Many ETKA Electronic Catalogue, even free on webs, but i don’t recommend those because most of them may be expire in the near future.
The reported problem is, that two of the displayed installation steps
have a wrong representation in some versions of Windows 7/8/10.
STEP 1: Choose ETKA Variant:
 STEP 2: Choose ETKA Version:
Note: Please look at the "right representation" picture for your decision
 STEP 3: Welcome window:
 STEP 4: "Version to install" window:
 STEP 5: Installation Summary window:
 STEP 6: Choose install target folder:
Note: Please look at the "right representation" picture for your decision
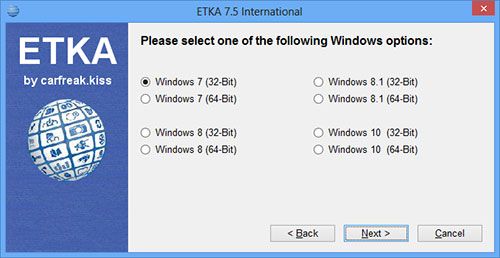
 STEP 7: International Version window:
 STEP 8: Installation process:
 STEP 9: Hardlock Driver Installation:
After ETKA installation finished the hardlock driver installation is initialized.
Here you can/must follow the displayed installation steps.
I hope this guide is helping you, to install ETKA Electronic Catalogue for AUDI VW Seat Skoda.
First, to get V7.4 ETKA Electronic Catalogue For Audi VW Seat Skoda here:
http://www.obdexpress.co.uk/wholesale/audi-vw-seat-skoda-etka-electronic-catalogue-v74-multi-language-3169.html (Never Expire!)
Many ETKA Electronic Catalogue, even free on webs, but i don’t recommend those because most of them may be expire in the near future.
The reported problem is, that two of the displayed installation steps
have a wrong representation in some versions of Windows 7/8/10.
STEP 1: Choose ETKA Variant:
Note: Please look at the "right representation" picture for your decision

Note: Please look at the "right representation" picture for your decision


After ETKA installation finished the hardlock driver installation is initialized.
Here you can/must follow the displayed installation steps.
I hope this guide is helping you, to install ETKA Electronic Catalogue for AUDI VW Seat Skoda.
Wednesday 13 April 2016
Chevrolet Mileage Correction with Digiprog 3 v4.94
Hello, guys. I made a small intruction here for you all on how to correct or change the mileage of Chevrolet Trailblazer using Digiprog 3 odometer programmer.
Disclaimer:
The guide is only for educational purposes and not by any means to be wrongly or criminally used for cheating or manipulating with cars mileage for sales purposes
Tool used:
Digiprog 3 v4.88+ st01/2 adapter
 Model:
Chevrolet Trailblazer LTZ 2002
Here are my steps to change km:
connect serial port cable first then AC adapter
plug to the Digiprog 3 unit, then power it up

 press the tick button to continue
 press 1 for the password and press the tick button
 choose EEPROM to read the chip


 choose EEPROM-> READ

 choose 95
 choose s 95020
 reading the chip
 chip data
 choose FILE-> SAVE, incase that something goes wrong
 name the file and press the tick button to save
 disconnect the power and restart Digiprog 3 to check the file
connect AC adaoter and plug again to start the unit
unplug the serial cable to verify the saved file and make sure that the unit is reading from saved file (NOT directly form the chip)
 press the tick button
press 1 for the password and press the tick button
choose EEPROM
choose FILE-> SHOW, to open the list of saved chip data files
 choose the saved file with the name
the old chip data is fine, then proceed (DELETE, then cross button)


 unplug
 connect to the chip
 restart Digiprog 3
choose CAR/TRUCK
 use up and down arrows to choose CHEVROLET->TRAILBLAZER

 make sure the serial cable is connected in a right way
press the tick button to start reading the chip data
 OLD mileage written in the top right corner and put the new mileage and press the tick button to write on the chip


 Done!
Done!
Note:
- always save the old chip data in the Digiprog 3 programer for any thing goes wrong so you can write it back if needed or even if someone fried his chip and needed to install new chip it will be really easy to write it back
- if you needed any time to restart again or your Digiprog3 got stuck while working simply take out the Power plug and reinsert it again to restart the programmer (Never ever unplug AC power Plug when odometer correction tool is reading or Writing on the EEPROM CHIP otherwise you will destroy it)
Disclaimer:
The guide is only for educational purposes and not by any means to be wrongly or criminally used for cheating or manipulating with cars mileage for sales purposes
Tool used:
Digiprog 3 v4.88+ st01/2 adapter
Chevrolet Trailblazer LTZ 2002
Here are my steps to change km:
connect serial port cable first then AC adapter
plug to the Digiprog 3 unit, then power it up


connect AC adaoter and plug again to start the unit
unplug the serial cable to verify the saved file and make sure that the unit is reading from saved file (NOT directly form the chip)
press 1 for the password and press the tick button
choose EEPROM
choose FILE-> SHOW, to open the list of saved chip data files
the old chip data is fine, then proceed (DELETE, then cross button)
choose CAR/TRUCK
press the tick button to start reading the chip data

Note:
- always save the old chip data in the Digiprog 3 programer for any thing goes wrong so you can write it back if needed or even if someone fried his chip and needed to install new chip it will be really easy to write it back
- if you needed any time to restart again or your Digiprog3 got stuck while working simply take out the Power plug and reinsert it again to restart the programmer (Never ever unplug AC power Plug when odometer correction tool is reading or Writing on the EEPROM CHIP otherwise you will destroy it)
Subscribe to:
Posts (Atom)